Categories
Meaty

Chicken burrito bowl

Do you ever look at one ingredient, and the rest of your dish goes from there? It doesn’t even have to be a main ingredient, sometimes it is a herb, spice, or something random like bamboo shoots. I get a bit of a craving for it and then off I go.

I bought a coriander plant last week – I know it is a bit polarising, with a lot of people who don’t like it (especially on Sunday Brunch, it seems) but I love it. And it pairs perfectly with one of my other favourite foods – avocado. Those were the inspiration for my latest Mexican (ok, Tex Mex) dish. That and my new Wahaca cookbook, which is lovely to leaf through! I have added quite a few cookbooks to my collection over lockdown – last week I bought ‘Mexican Food Made Simple’ by Thomasina Meirs to expand my Mexican recipe repertoire beyond Tex Mex, the Dishoom cookbook because of those Gunpowder potatoes, and the Ice Kitchen, because I intend to do loads of batch cooking to prep for baby’s arrival! At this point I’m not sure whether the freezer will arrive first, or the baby, which is a slight flaw in my plan. Fingers crossed! Anyway, I digress. Back to my Tex Mex bowl.

I had some leftover roast chicken, and some trusty peppers, mushrooms and onions. I also had some tortillas that needed using up, so figured I’d make my own chips – healthier than the shop bought version, even if not quite as satisfying.

The result is pretty healthy, depending on how much sour cream and cheese you pile on, but feels like a treat! Again this is a very easy recipe to swap things in and out of, depending on what you like/have/dislike. I love sweetcorn so included it in my bowl, but S hates it so he just got more veggies! Swaps listed at the end… Enjoy!


Chicken burrito bowl – serves 2

Ingredients

  • 200g leftover roast chicken, or if using raw, 2 chicken breasts, or 4 thighs – chopped
  • 150g brown rice
  • 1 pepper, chopped
  • handful of mushrooms, chopped
  • half an onion, chopped
  • handful of cherry tomatoes, halved
  • 2 tsp fajita spice mix (make your own here) and / or chipotle paste (I use both as I like quite a kick)

Extras: choose as many of these as you like!

  • 1 avocado, halved and sliced
  • Handful of coriander
  • Sweetcorn
  • Cheddar cheese, grated – as much as you fancy!
  • Sour cream – 2 tbsp
  • 2 tortillas
  • Olive oil, salt

Method

  • Start off by cooking the rice according to packet instructions
  • Pre-heat your oven to 180 fan. Baste your tortillas with a little olive oil and salt, and cut into triangle shapes (cut in half, then each half into 4s). Lay them flat on a baking tray, and bake for 7 minutes until golden brown (keep an eye on them as oven temps vary a lot!). Remove and leave to cool – they will crisp up!
  • Next for your chicken. If you are using raw, then start off with some oil in a pan on a medium heat, and brown off your chicken pieces. Remove from the pan.
  • Whether raw or cooked, the method is the same now – gently fry the onion first, then add the pepper and mushrooms. Once these have softened, add the chicken, and 2 tsp fajita spice mix. Stir so the juices are all absorbed. Next add the chipotle paste – around 1 tsp. If you are not using the fajita spice mix, then use more chipotle paste. Stir until evenly distributed, and add in your cherry tomatoes. 
  • Time to build your burrito bowl! Pop the rice in first, then your chicken and veg mix. Add your extras around the bowl. As you can see from the picture, I went for sweetcorn, sour cream, avocado, coriander and a sprinkling of cheese in the middle, with a few crispy tortillas to finish. 
  • YUM!

Swaps and alternatives

  • Chicken: steak strips would work well here, as would beef mince, turkey mince, roast pork etc. Endless options, just adjust cooking times.
  • Go veggie: use some butternut squash or sweet potato, maybe adding some refried black beans for a protein kick!
  • Cheddar: you could use feta here instead. Ideal would be queso fresco but I have never found it here, even pre lockdown!
  • The veg can be varied/swapped in or out although I got into trouble with S for putting broccoli in fajitas once. Apparently that is absolute sacrilege 🙂 But courgettes would work well for example!
  • Tomatoes: if you don’t have fresh, then half a tin would work well. I wouldn’t leave out altogether though as it does keep the whole mixture nice and moist
  • Sour cream: swap for greek or natural yoghurt, or creme fraiche
  • Brown rice – any type of rice would do, or you could go for quinoa, or sweet potato (roast in oven in cubes, or whole in oven or microwave)
Categories
Meaty Veggie

An Indian feast

My friend Mel has been cooking through the Dishoom cookbook with her hubby, and discovered their ‘Gunpowder potatoes’. They aren’t the simplest as you need a very particular spice mix, which arrived in the post a few days after Mel had told me about them… I was very grateful and keen to try! I haven’t included that recipe here as it really is quite elaborate, and ingredients aren’t particularly easy to get hold of these days. However, I often get inspired by a single ingredient or dish, and it was definitely the case this weekend. I decided I would make a bit of an Indian feast. I have quite a few curry dishes I am fond of making – saag paneer, or a simple chicken curry with loads of veggies thrown in. I occasionally make my own paste but usually rely on Patak’s!

However, seeing as I have so much time these days, I decided to experiment, and decided to make lamb samosas, red lentil dhal, Mel/Dishoom’s gunpowder potatoes, and tandoori paneer with veggies. Some real discoveries in those recipes, and ones I would definitely do again! I am just going to go through the samosas here as I just followed existing recipes for the others – but I can’t recommend them highly enough.


Red lentil dhal – super healthy, quick and tasty. And vegan, as it is made with coconut milk. I know there are a million dhal recipes out there, but this was the first time I’d given it a go, and I was really pleased. Give me a bowl of this and a naan bread any day…

Mel / Dishoom’s Gunpowder potatoes – I didn’t have the coriander or fresh green chillies, and used lemon instead of lime – but these were a total delight! And also reasonably healthy. The kebab masala is what Mel sent me in the post, recipe here.

Paneer and veg tandoori-ish – This was super simple. I cubed 250g paneer and my veg (1 onion, 1 pepper and 1 courgette), and then mixed them through with 2 tbsp greek yoghurt (any plain yoghurt will do) and 2 tablespoons of curry paste (good old Patak – I used Korma paste but any will do). I left it to marinade for a couple of hours, and then put it in the oven for 30 minutes at 180. Simple, very flexible (you could use any veg, and could swap the paneer for chicken if you fancy, or make it more substantial with butternut squash or sweet potato – just adjust the cooking time).

And last but not least – my favourite part of the feast – lamb samosas! Loosely based on a recipe I found on BBC Good Food, but with a few adaptations. I will admit they didn’t look very pretty as my samosa folding skills aren’t up to much, but they tasted amazing. In fact, the lamb mix could easily be eaten on its own with some rice or a naan bread. Here goes. And my apologies to any Indian cooks out there who will probably be horrified at this adaptation!


Lamb samosas – serves 4

Ingredients

  • 400g lamb mince
  • 2 tbsp curry paste – I used Patak’s Korma, but if you prefer more of a kick, go for one of the spicier ones. 
  • 1 carrot
  • 1 small onion
  • 2 handfuls frozen peas
  • 2 tbsp mango chutney
  • filo pastry (shop bought!)
  • oil, salt and pepper

Method

  • Start by making the filling. Heat a tbsp of oil in a frying pan and brown your lamb mince over a med/high heat. Don’t move it around the pan too much so you get some browning on the bottom, then make sure it is cooked through. 
  • Grate the onion and the carrot on a coarse grater, and add to the mince. Cook for a few minutes until they are effectively dissolved. Add the curry paste, stir through, and cook for a few minutes. 
  • Remove from the heat and put the mix into a heatproof bowl. Add the peas and mango chutney, and mix well. Put aside to cool. 
  • Take your filo pastry out of the fridge, and lay out a sheet in front of you. Fold it in half, and put a tablespoon of the lamb mixture at the top. Fold over the side so it makes a triangle, and continue folding over until you have used up the strip of filo. I will be honest here – I ended up making slightly random parcels as I couldn’t get them to close properly! Whatever shape you end up with doesn’t really matter, it will still taste good…
  • Brush your samosa/parcel with oil, and place on a baking sheet. Continue until you have used up all the filo/mince. 
  • Bake at 180 fan for 30 minutes, until crispy and the filling is piping hot. 
  • Enjoy with some cool raita or an extra dollop of mango chutney. 

Swaps and alternatives

  • Make it veggie – you could make veggie samosas with potato, more peas, and cubed onion/carrot, maybe cauliflower. Just make sure all the veg are cooked before adding the curry paste. 
  • You could easily use leftover roast lamb from your Sunday dinner for this, just cut/shred it and fry it lightly before adding the carrot, onion and paste. 
  • Paste – you could make your own of course, or use any other type you fancy. I wouldn’t go too spicy because you will lose the sweetness of the mango chutney. 
Categories
Baking

Mum’s favourite dessert – baked apples

My mum is always telling me how much she loves baked apples. I have never seen the appeal if I’m honest – I much prefer the crisp tartness of a fresh apple, and thought of it as a waste to bake them. Then along came my fruit and veg boxes, and a vast amount of apples I could never get through. S is allergic so I had to find something to do with them. I made a delicious apple and cardamom cake, but as it seems that my sweet tooth knows no limits, I figured I’d try something a bit healthier for once.

I can’t tell you how pleasantly surprised I was – they were so delicious, so simple and so healthy! They caramelise gently, particularly with the help of the raisins and marzipan. I will definitely be making them again, and would buy apples especially. Again, a lot of the ingredients can be swapped around, so give it a go if you have a glut of something… I had them with yoghurt but also with a bowl of granola for brekkie. They are delicious on their own too of course, and don’t have a hint of added sugar (other than the marzipan), so great for a sweet treat without the extra calories.

You can take a shortcut and achieve a similar result in the microwave. You won’t get the caramel stickiness which I love, but it is quicker if you fancy something sweet at the end of a meal and have nothing to hand…

Simply baked apples

Ingredients

  • 2-3 apples
  • 1 tsp cinnamon
  • 1/2 tsp nutmeg, grated
  • handful of raisins
  • squeeze of lemon juice
  • a few tbsp water
  • optional extra: leftover blobs of marzipan from Christmas!

 Method

  • Cut your apples into eights (half, quarters, then again!) and remove the core/pips. I left the skin on as they retain their shape that way, but you can peel them if you prefer. Remember though, a lot of the goodness is in the peel or just beneath the skin!
  • Place the apples in an oven proof dish, sprinkle over the lemon juice, water, cinnamon and nutmeg. Dot the raisins around (and the little blobs of marzipan, if using). Mix everything together and bake for around 40 mins at 180C fan until they are soft but they have still retained their shape. 
  • Enjoy with yoghurt, ice cream, or with a bit of granola for a delicious brekkie. 

Swaps and alternatives

  • This would work well with pears, or plums!
  • If you don’t have cinnamon/nutmeg, try mixed spice
  • Lots of dried fruit would work well instead of raisins – dates, figs, or leave them out altogether. They do add a hint of caramel though when they bake which is delicious…
Categories
Fish supper

Filet o fish – ish

Lockdown has started a bit of a ‘fakeaway’ craze as people are trying to recreate their favourite takeaways at home… It is very satisfying and usually a lot better for you, and at least you know what has gone into it all! So far I’ve made kebabs – a grilled chicken and a lamb kofta version, complete with ‘kebab sauce’ which was a bit of a revelation, I must admit. Chinese lemon chicken with egg fried rice was also a good one – thank you Ken Hom for that! I also love Mindful Chef’s version of sweet and sour pork, although seeing as it isn’t even close to being deep fried or battered, it isn’t really a fakeaway… I am waiting for an ‘at home’ pizza kit from Pizza Pilgrims to give that a go (although there are plenty of pizza places still operating, that’s not one I miss particularly). I do miss burgers though – especially beef burgers. I always have mine medium rare and I can’t at the moment, so have switched to chicken or other alternatives.

I don’t remember the last time I actually ordered a filet’o’fish when in McDonald’s – double cheeseburger and a side of nuggets for me, usually… but I had a sudden craving for one last week (blame the pregnancy), so thought I’d give it a go. I’ll admit that using fish fingers would yield a very similar result with a lot less hassle – but I have the time, so why not! I also completely forgot to take a picture hence the McDonald’s pic on the cover of this recipe. I will get the hang of this food photography eventually, just bear with me.

Fish burgers and chips – serves 2

Ingredients

Fish burger

  • 2 cod or other white fish fillets 
  • 2 burger buns (I used brioche)
  • cheese slices – I used ‘burger cheese’ but any will do
  • 1 egg, beaten
  • 2 tbsp flour
  • 60g breadcrumbs (either bought or made with some old bread)
  • 4 baby gem (or other) lettuce leaves
  • olive oil, salt and pepper

Tartare sauce

  • 2 tbsp mayonnaise
  • 1 tsp capers, chopped
  • 2 gherkins, chopped
  • 1 tsp lemon juice

Chips

  • 2 potatoes
  • olive oil, salt, pepper

Method

  • Start with the chips, as they take the longest. Pre-heat the oven to 200C/fan 180C. Scrub your potatoes so the skins are clean. You can peel them if you prefer, but I like the texture of skin on chips, and they have a lot of goodness in. Cut them into even chip shapes – 1.5cm/half an inch works well and they end up crispy on the outside and fluffy on the inside! Rinse them in a colander to get rid of the starch, and pat them dry with a clean tea towel. 
  • Lay them onto a baking tray, sprinkle over the salt (add oregano or celery salt if you like/have it), and the olive oil. Mix well and then spread the chips evenly, so they don’t overlap. Bake in the oven for 40 minutes, turning once half way through. 
  • For the tartare sauce: mix the mayo, with the lemon juice, the capers and gherkins, and season. 
  • For your fish burgers – spread a few tbsp of flour out onto a plate, then beat the egg in a shallow bowl. Put the breadcrumbs onto a third plate, and season them well with salt and pepper. Coat the fish in the flour, then the egg, and finally the breadcrumbs. Press firmly to coat the fish evenly, and set aside. 

  • When your chips have been in 30 mins, heat a frying pan on a medium heat. Cut your burger buns in half and put them cut side down into the dry pan to toast them lightly. Set aside. 
  • Add the oil to the hot pan, and fry your fish fillets for about 4 minutes on each side, until cooked through. 
  • Time to assemble your burgers! Spread half the tartare sauce on one side of each bun, top with the fish fillet, the cheese, and the lettuce. Pop the top of the burger on, and enjoy with your chips. You can add a green salad to the meal if you want some greens in there…

Swaps and alternatives

  • Instead of cod: most white fish will work. Pollock, haddock etc. If you don’t want to bother with the coating in breadcrumbs etc, you could cheat and use fish fingers!!
  • Cheese: I used that very plastic ‘burger cheese’ but cheddar or any other cheese that melts would work just fine. It is worth putting the fish in the oven with the cheese on top for a minute or so to help it melt…
  • Burger buns: any soft bread or rolls will do if you don’t have burger buns. You could also make these into a lovely wrap with a tortilla. I’d cut the fish fillets into thinner strips for this version. 
  • Tartare sauce: you could use plain yoghurt to make a healthier version; season with salt and pepper, add capers/gherkins if you have them, but leave out the lemon. You could add some chopped dill or chives if you like. 
  • Chips: you could use sweet potatoes also, or parsnips! These will cook a bit faster so adjust the cooking time slightly. 

Categories
Veggie

Jazzing up courgettes…

It’s hard to find innovative ways to use the same ingredients all the time! You get stuck in a bit of a rut with the same recipes and it’s hard to think of something different. For some reason a few weeks ago I ended up with about 10 courgettes and did my usuals – roast courgettes with tomatoes, garlic and herbs, and my other more spring like favourite which is raw courgette ribbons with lemon zest, chilli and olive oil. So when another couple of courgettes showed up in my veg box the following week, I figured I had to do something new.

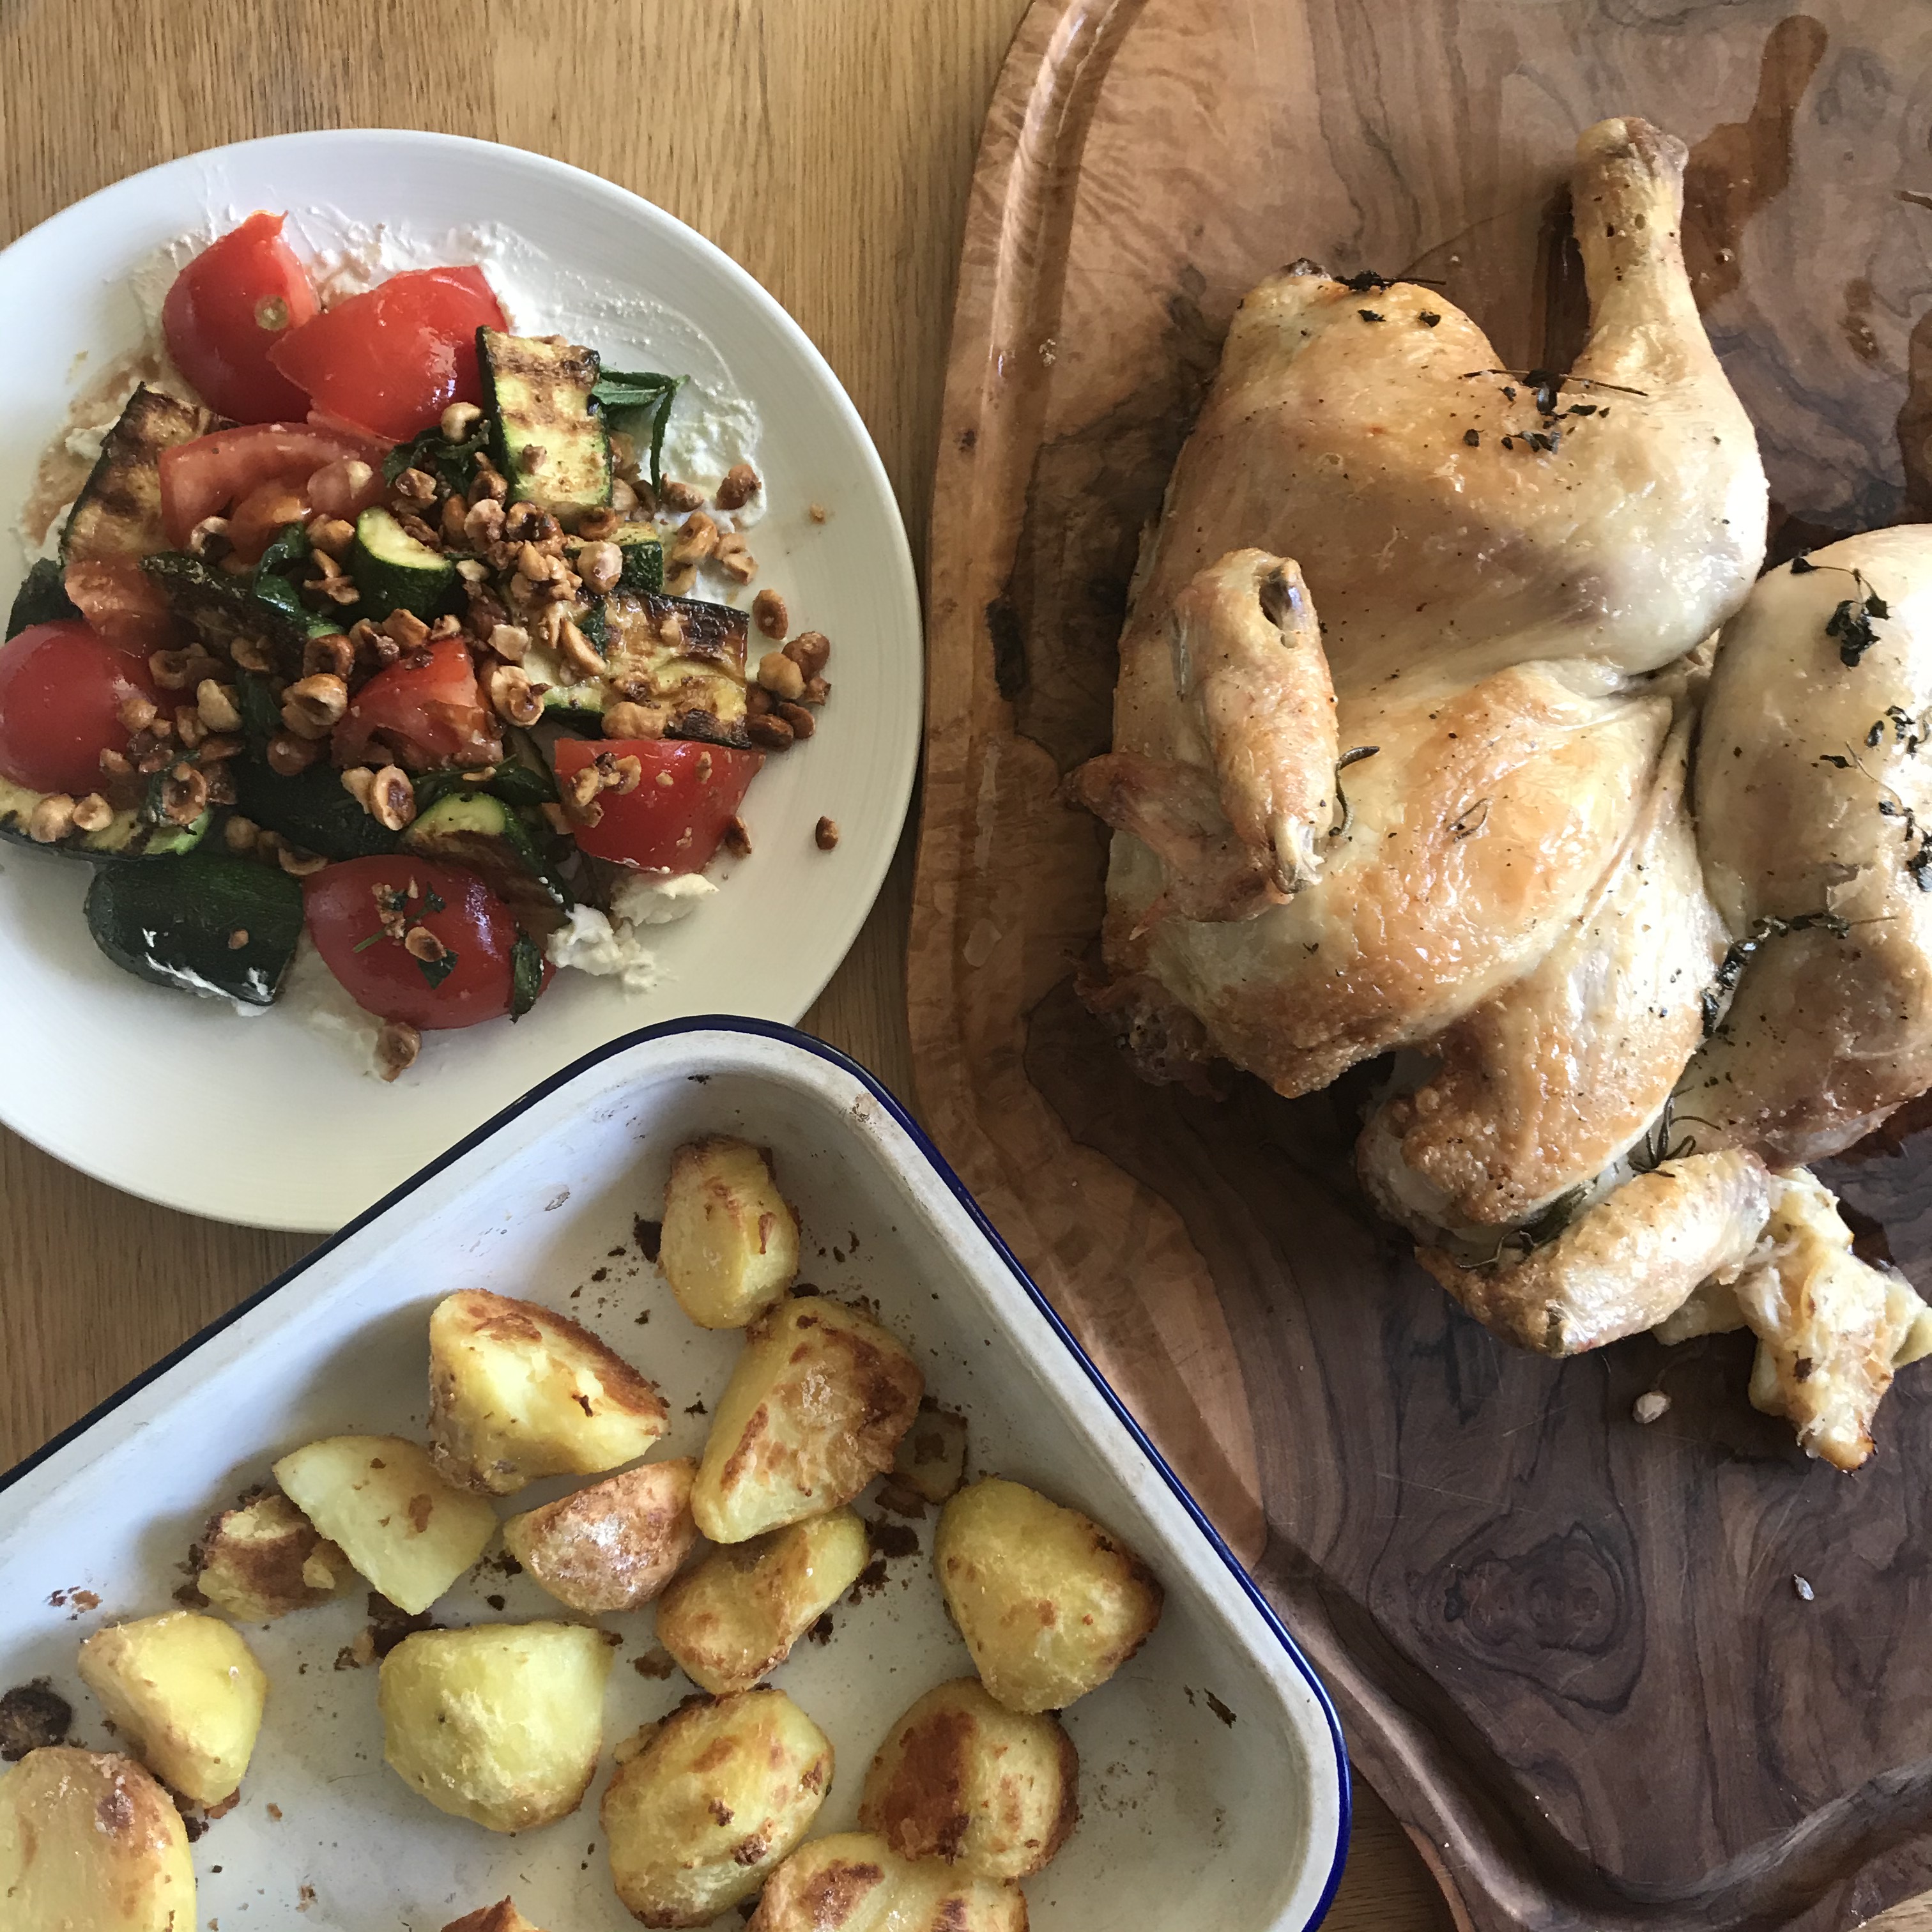
A friend of mine at work had organised a pot luck lunch for all of us in pre lockdown days. It was really fun to see what everyone came up with, and a great occasion for a little recipe swap… I baked classic chocolate and pecan brownies, but my favourite discovery was a truly delicious courgette and feta salad, made by Rachel. I finally got round to making it last week – predictably I found I was missing a lot of the ingredients so had to make a few tweaks, and was actually really happy with the result.

The original recipe Rachel used is this, but I’m including my version here along with a few swaps and options for you in case, like me, you just don’t have everything available at the moment. So here is my version of a courgette, tomato and feta salad with toasted hazelnuts. Swaps included at the end of the recipe!

Courgette, tomato and feta salad with mint and toasted hazelnuts

Serves 2, generously

Ingredients

  • 2 courgettes
  • 2 tomatoes
  • 100g feta
  • 100g yoghurt (greek or natural)
  • fresh mint sprigs
  • 1 lemon
  • 60g hazelnuts
  • olive oil, balsamic vinegar, salt & pepper

Method

  • Slice the courgettes lengthways, put them in a colander or sieve, and sprinkle over some salt. Leave for 15-20 mins to draw out the moisture, then pat them dry. 
  • Make a balsamic vinegar dressing – 1 tbsp balsamic vinegar, 2 tbsp olive oil, and salt and pepper. Set aside. 
  • Heat a griddle pan or frying pan on a medium heat, drizzle in 1 tbsp olive oil, and place the courgettes cut side down. Fry for 5 mins on each side until slightly charred. I like them with a bit of bite, but if you like them softer, fry for longer.  Remove from the pan and pat with kitchen paper, and leave to cool for a few minutes. Cut each piece into 3. 
  • Roughly cut up the tomatoes, add to the courgettes, and stir through the balsamic vinegar dressing and the mint leaves. The courgettes will still be warm so they will absorb some of the delicious dressing. 
  • Toast your hazelnuts lightly either in the oven (place on baking tray for 5 mins in oven preheated at 180 degrees) or in a frying pan (place in dry frying pan and gently toast). Once toasted, place them on a chopping board and roughly crush with the side of a knife. 
  • Mix the feta and yoghurt together in a bowl, and add salt, pepper, the zest of half a lemon, and a squeeze of lemon juice. Spread this out on a plate. 
  • Pop your courgettes and tomatoes on top of the feta mix, and sprinkle over the hazelnuts. Add a drizzle more olive oil if you like. 
  • Enjoy with some toasted pitta bread or as a side for roast chicken (or lamb, or anything really). I had mine with a spatchcock chicken and roast potatoes – we had lots leftover so enjoyed it the next day too!IMG_4722


Swaps and alternatives

  • Instead of courgettes: use peppers, aubergines, any type of squash with soft skin (i.e. not butternut or anything like that) – would probably work well with asparagus too! 
  • Tomatoes: you don’t have to include these at all – I just wanted to make the salad go a bit further. Use all courgette, or a mix of any of the above veg. 
  • Instead of feta: you need cheese with a little sharpness, so goat’s cheese would also work well
  • Instead of yoghurt: you could use ricotta as in the original recipe – you basically just need something to soften the feta and make it spreadable. Creme fraiche could work too!
  • Swap out the hazelnuts: these aren’t essential, but they give such a gorgeous texture that I’d really recommend having some sort of nut in there. Toasted almonds or pine nuts would be great also. 
  • Instead of mint: you can skip it altogether – but if you do have any fresh herbs, then oregano, basil or chives would all work well with the lemon and balsamic combo. 
  • Instead of balsamic dressing: white wine or cider vinegar dressing would be good – add half a teaspoon of sugar to the vinegar to take the edge off. Or a lemon dressing, again with a little sugar added. 


There we go – hope you enjoy, and let me know if you try it – and what swaps you make!

Categories
5 ways with... Baking

5 ways with… bananas

I don’t know about you, but I have found lockdown shopping very difficult to get used to. I live in a zone 2 in London, and have a mini supermarket in my building, another one a 2 minute walk away, and a large one a 5 minute walk away. I used to do a big shop once a month online for the bulky things, and then top up during the week, usually on the way home from work once I had decided what I fancied cooking that evening. I rarely had breakfast at home, and unless I had particularly appetising leftovers to use up, rarely brought my lunch into work. So shopping was easy, daily – and I never struggled to find what I needed.


Enter Corona, and isolation. During the first few weeks, impossible to get an online delivery slot with our usual providers, so I turned to the new suppliers popping up here and there – I know a lot of them through work as they no longer have restaurants to supply, so are now turning to consumers. They aren’t quite used to dealing with 500g bags of flour as opposed to 16kg ones yet, but they are getting there! So in general I find that I am ending up with lots of one item, and too little of another – so I am starting a series of ‘5 ways with…’ to deal with the most common of these. Hope it is useful – let me know if there are any ingredients you’d like ideas for in the comments.

A few weeks ago, I ended up with 6 bunches of bananas instead of 6 bananas – which is the inspiration for this post, although even with all these ideas, I didn’t manage to get through them all and gave quite a few away to neighbours (from a sensible social distance, fear not). Bananas are a particular bugbear of mine – apparently we waste 1.4 million bananas per day in Britain alone, isn’t that awful?!


First things first – bananas freeze really really well. At whatever stage of ripeness – you just need to know how to use them. The browner they are, the sweeter they taste. I personally prefer them almost green, so that’s when I freeze them…

  • Before they go brown, verging on still green: great for  a simple refreshing snack (for adults or kids!), or ice cream: peel and chop your banana, put it in a freezer bag, and pop it in the freezer. Then snack on delicious banana at any time but particularly instead of a calorie laden ice cream. 
  • If they are way past their best: these are perfect for banana bread. I leave mine until they are almost black  – that way they are really sweet and you barely need to add any sugar to your cake recipe

Frozen or not, here are my favourite ways of using up a glut of bananas:

  1. The obvious one – make banana bread! 

There are hundreds of recipes out there. I used to swear by Delia’s recipe but have recently been converted to my version of Cookie and Kate’s recipe. It is a brilliant recipe, relatively healthy, and very easy. I make a few modifications – she calls for 2 large bananas, but I use 4-5 of my freezer blackened bananas which almost disintegrate. You can defrost them at room temperature or just pop them in the microwave for 20 seconds, and they will almost fall out of their skins. Then I reduce the amount of honey by half, because the bananas are super sweet. And just  before baking, I stir in chopped up dark chocolate. Such a good combo! 

This is also an excellent and very easy recipe for vegan banana bread – great if you are out of eggs (but somehow have flaxseed…). Tried and testing as part of the baking kits I used to make, it is a perfect recipe to do with kids as it is all in one bowl, and you can’t really go wrong! Again, adding chocolate makes it pretty special. 

2. Make smoothies and prepare smoothie packs

My favourite smoothie is peanut butter and banana. Use a frozen banana, or a fresh one – the ripeness will determine the sweetness. Use milk of your choice (dairy, oat, almond etc), and just whiz them up. You can get fancy with chia seeds, cinnamon and all sorts – and obviously you can use any type of nut butter, not just peanut. There are tons of smoothie recipes that call for bananas, so pick your favourite fruit and experiment – strawberry, blueberry, raspberry – or even kiwi, or pineapple. I love adding a slice of ginger to those for a little kick. You can use apple juice or coconut water instead of milk also. The possibilities are endless! 

To make smoothie packs, put together little freezer bags with your favourite combo, and when you’re ready for one, just add the frozen fruit and mix with your liquid. 

3. Banana ice cream

So simple and so good. Take one of your chopped bananas out of the freezer, and let it rest at room temperature for 20 mins or so. Pop it in a blender or food processor – either on its own, or add a teaspoon of any of the following: Ovalmaltine, drinking cocoa, nut butter, caramel spread. And blend! You will see the texture change completely. Scoop it out and eat it right away. It genuinely tastes like banana ice cream but with no added sugar, cream etc. 

4. Banoffee ice cream

This is in a different league, which is why it has its own category. It is a recipe by Jo Pratt, and is simple, quick and clever.

Serves 2:

2 frozen, chopped bananas, frozen for at least 2hrs.

75ml custard

30ml double cream

1 tbps dulce de leche/ toffee sauce

All you need to do is blend all these together – do it at the very last minute, before serving. Not quite as light as the banana only version, but worth every calorie.

5. Banana pancakes

Pancakes are a breakfast favourite in this household. Chop up a banana and use it instead of blueberry in this classic recipe (even better if you gently fry the bananas in butter beforehand until they caramelise slightly). My new discovery is another Cookie and Kate recipe for wholewheat banana pancakes – they use a lot of baking powder to make them rise, but that counteracts the weight of the bananas in the batter which could otherwise make them quite heavy. Absolutely delicious and you’d never be able to tell they are ‘healthy’.


So there you have them, a few ideas on what to do with too many bananas. Hope some of these recipes come in handy – and you never have to waste another banana again!

P.S. this post is an updated version of one I wrote in my Bakit days, in case any of my 3 followers recognise some of the content…

Categories
Veggie

Caramelised leek & Gruyère quiche – a healthier version

I’ve been getting a veg box over the last few weeks from @palegreendot which has been great – lots of seasonal veg that I don’t normally buy, which is forcing me to explore new recipes – parsnip crisp anyone?

Leeks are a gorgeous wintery vegetable that are so versatile and delicious – but they are not often the star of the show. I love leek and potato soup but you don’t get that hit of caramelised gentle sharpness that you get from a leek gently fried in butter… So I opted for a quiche! I’m also conscious of all the baking I’m doing, so my main meals need to balance those out at least a little – hence trying to find a sort of healthy version.

This one is made with wholemeal pastry, and contains a lot less cream than the versions I normally make. Since I am using eggs as if hens are going to stop laying, I also adapted the recipe to only use one. You can make a more traditional and richer recipe by using two, but I promise that you won’t notice a huge difference with just one. The mixture is thinner than usual, which means you have to blind bake your pastry for a little longer for a crisp base! Of course you can use shop bought shortcrust pastry if you’d rather – but don’t skip the blind baking bit.

I had some mushrooms that needed using up, and some Gruyère cheese – although Cheddar would be delicious too. So again, lots of swaps available for this recipe, all listed at the end of the post. Let me know what you think!

For the pastry

  • 200g wholemeal flour
  • 100g softened butter
  • 6 tbsp water

For the filling

  • 2 large leeks, finely sliced and rinsed
  • 100g mushrooms, chopped into quarters
  • 100g grated Gruyère cheese
  • 1 tsp sugar
  • 1 egg
  • 150ml single cream
  • 200ml milk
  • salt & pepper, butter and oil for cooking

Equipment

  • Quiche dish
  • 2 mixing bowls
  • Baking beans, baking paper/parchment
  • Frying pan

Method

  • Start off by making the pastry. Put the flour into a bowl and tip in the butter. Using a fork or your fingers, work the butter through the flour until the mixture looks like breadcrumbs. Then add the 6 tbsp water and combine until you have a smooth ball of dough. If it doesn’t come together easily, you may need to add a sprinkling more water. Leave it to stand for around 15 minutes.
  • Roll out your pastry until it is about the thickness of a £1 coin, and a good 5cm wider than your quiche dish. Pick up the pastry (you can use your rolling pin) and drape over the dish. Use some of the pastry trimming to make a little ball, and use this to press your pastry into the edges of the dish. For detailed step by step pictures see here . Crimp the edges of your quiche with a fork to make it look pretty, and put your quiche case in the fridge whilst you get on with the rest.
  • Heat the oven to 200/180 fan
  • Gently fry the mushrooms and leeks in a little oil and butter until softened. This should take around 15 minutes. Add 1 tsp sugar and continue to cook for another minute or so.
  • Meanwhile, mix together the egg, cream and milk. Season well with salt and pepper.
  • When the oven is hot, remove your pastry case from the fridge and prick it all over with a fork. this will help it not bubble up when you are cooking it. Line the dish with baking paper, and pop your baking beans in. Blind bake for 15 minutes. Then remove the beans and paper, and bake for a further 10 minutes. This will avoid the dreaded soggy bottom!
  • Next add your leek and mushroom mix to the base of the quiche, sprinkle over the cheese – and pour over your egg and cream mixture.
  • Bake in the oven for 30 minutes until the top is golden and there is no wobble.
  • Delicious hot or cold, served with a green salad – a perfect spring lunch!

Swaps and alternatives – I can’t think of much you can’t put into a quiche, but here are a few simple ideas in case you don’t have any of the above ingredients

  • Leeks: swap out for onions. They will reduce and caramelise in the same way. Or you can use courgettes or peppers, chopped and fried (skip the sugar with these) – even a little spinach, as long as it is very well drained and not watery.
  • Gruyere: use grated Cheddar or crumbled feta (particularly good with the courgettes!)
  • Try adding bacon to it – fry with the mushrooms and leeks for a bit of extra salty deliciousness.
  • If you want to make it richer and creamier, reduce the amount of milk and make up the quantity with an extra egg, and cream.
  • And of course if you don’t have wholemeal flour – just use plain.
  • For the leftover pastry – store in the fridge for 3 days or in the freezer for another day

Categories
Meaty

Lockdown burrito bake

Very excited to be publishing my first lockdown recipe! This recipe came about because I had too much beef mince for a bolognese, but not quite enough to freeze and save for another… S loves Mexican food, and I had a few handy store cupboard ingredients that I used to make up the rest. I was very pleased with the results. I used sweetcorn on one side and jalapeños on the other, so you can really play around according to who likes what in your household!

It is a very flexible recipe with lots of swapping options, listed at the end of the recipe!

Ingredients – serves 4

  • 250g beef mince
  • 1/2 onion, chopped
  • 1 clove garlic, chopped
  • 100g grated Cheddar
  • 1/2 tin chopped tomatoes or passata
  • tin black beans (pinto beans), drained
  • 200g rice (any rice works well!)
  • 2 tsp chipotle paste OR fajita spice mix **
  • Plus you will need: salt & pepper, olive oil for frying, some water
  • Optional extras: sweetcorn, jalapeños, guacamole, sour cream/natural yoghurt, tortilla chips

Method

  • Start off by making your minced beef mix. Fry the chopped onion in a little oil over a medium heat until softened. Add the beef mince and let it brown (don’t move it around the pan so it can brown on the bottom) – then break up with 2 wooden spoons and cook through.
  • Add the garlic and chipotle or spice mix and stir to distribute evenly. Cook for 1 min.
  • Add the beans, and tomatoes, and a splash of water and season. Leave to cook for another 10 minutes.
  • Meanwhile, cook your rice according to packet instructions, and drain.
  • Lay the rice in an ovenproof dish. Distribute the beef mixture on top. If these were made earlier and have gone cold, pop this in the oven for 15 mins at 180 fan until thoroughly warmed through.
  • Add jalapeños and/or sweetcorn, if using. Sprinkle the grated cheese all over and grill under a moderate heat for 5 minutes, until the cheese is melted and bubbling.
  • Serve at once with your choice of accompaniments! Some ideas below:
  • Guacamole, sour cream, chilli and mango salsa, tortilla chips – I had some tortilla wraps in the freezer, cut them into triangles and brushed them with olive oil – baked them in the oven for around 7 minutes at 180 fan, and there you have your own home made tortilla chips!
  • Swaps and other options
  • Beef mince: you can use chicken instead. Leftover cooked chicken would be best and more tender, but otherwise breast or thigh chopped into small pieces would work just fine too. You could use leftover roast pork too!
  • Go veggie: roast squash or sweet potato, or a mix of roast veg (courgette, peppers, mushrooms)
  • Black beans: red kidney beans would work really well, but failing those, any kind of tinned pulse!
  • Cheddar: Red Leicester, feta (wouldn’t melt but would taste lovely)
  • ** if you don’t have either of these, just use whatever you can to give the beef some smokey chilli flavour – some chillies or chilli powder, smoked paprika, cumin – even Tobasco or another chilli sauce would work well here.
  • Add fresh coriander if you have it (I didn’t)

Hope you enjoy it – let me know if you give it a go…

Categories
Uncategorized

Fun and flexible food for good times and bad…

April 2020 – we’re what, 2 weeks into lockdown? I have been isolating for about a week longer, being part of the ‘vulnerable’ crew (#pregnantandparanoid). I have been very up and down – as I know everyone has – but the one thing that always keeps me happy, sane and “in flow” is cooking. Now that I am over stressing about whether my local Sainsbury’s are going to run out of feta (because if they do, I will definitely live), I can turn back to what is actually in my fridge/cupboard and think about what to cook!

I like all sorts of cooking. Making a few batches at the weekend to make weekday meals quick, one pot meals to save on washing up (the deal in our household is I cook, S cleans, so he is a fan of these…), Ready Steady Cook moments where I stare at the fridge and cobble something together from what we have – and obviously I get cravings, although I haven’t been able to give into these quite as easily recently! I also tend to get drawn into buying random pots of ingredients, and I’m quite enjoying challenging myself to make something new from those at the moment.

Lockdown cooking was really not a style I had ever had to explore! We have a supermarket basically in our building, and I have occasionally popped out 5 times in a single day to get bits and pieces I had forgotten. Not possible any more!! So the game as changed a little… I had never used dried chickpeas before but making your own hummus has actually proved to be very satisfying – so watch out for ‘5 ways to use…’ posts too!

I hate waste, ignore best before dates (within reason), and find genuine pleasure in using up packets of random stuff in my cupboards. I like balanced meals, mainly so I can make up for those with cakes and cookies – and my worst indulgence – crisps.

I think you get the picture that I love food, and I love cooking. My good friend Mel often has “kitchen parties” with her husband or her friends – she puts on some good music, opens a bottle of South Africa’s finest rouge and cooks up a storm (and usually sends me pictures afterwards). I wanted to bring a little of that spirit into these recipes and into this blog – we all need a bit of fun and joy at the moment, and food is meant for sharing and caring!

The last point of this blog is flexibility. People sometimes get stuck in front of a recipe because they don’t have exactly the right ingredients. Most of the time (in savoury cooking anyway) it really doesn’t matter. So all of my recipes will include swaps and other ‘works well with’ ideas. My mum sometimes takes it too far – the other day she tried to make a puttanesca using harissa, which I can see would work, but it wouldn’t be a puttanesca!

Do feel free to tell me if I can help with any of your Ready Steady Cook moments, or if you need inspiration for something. Hope you enjoy what’s here in the meantime.

Love, Natasha x